Google

May 30, 2013

Asynchronous processiong with Spring tutorial

Step 1: Create a maven based Java project of type jar. So, execute the following maven archetype command.

mvn archetype:generate -DgroupId=com.mycompany.app -DartifactId=my-app -DarchetypeArtifactId=maven-archetype-quickstart -DinteractiveMode=false


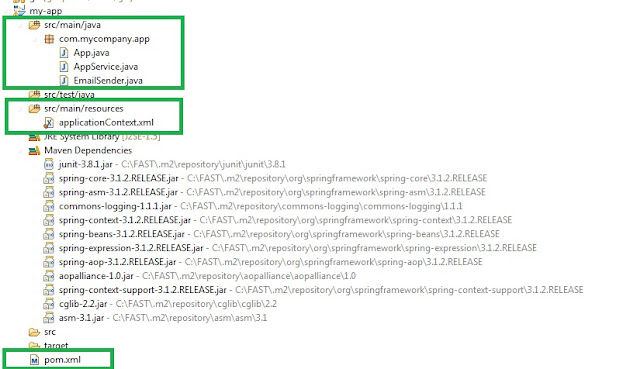
Step2: The above command would have created the maven skeleton. Add the "resources" folder under "src/main" to store the spring context file. Open the pom.xml file under the application and add the following depencies jar files. The cgilib version 2 is required for the spring 3 jars.

<project xmlns="http://maven.apache.org/POM/4.0.0" xmlns:xsi="http://www.w3.org/2001/XMLSchema-instance"
 xsi:schemaLocation="http://maven.apache.org/POM/4.0.0 http://maven.apache.org/maven-v4_0_0.xsd">
 <modelVersion>4.0.0</modelVersion>
 <groupId>com.mycompany.app</groupId>
 <artifactId>my-app</artifactId>
 <packaging>jar</packaging>
 <version>1.0-SNAPSHOT</version>
 <name>my-app</name>
 <url>http://maven.apache.org</url>
 <dependencies>
  <dependency>
   <groupId>junit</groupId>
   <artifactId>junit</artifactId>
   <version>3.8.1</version>
   <scope>test</scope>
  </dependency>

  <dependency>
   <groupId>junit</groupId>
   <artifactId>junit</artifactId>
   <version>3.8.1</version>
   <scope>test</scope>
  </dependency>

  <dependency>
   <groupId>org.springframework</groupId>
   <artifactId>spring-core</artifactId>
   <version>3.1.2.RELEASE</version>
  </dependency>
  <dependency>
   <groupId>org.springframework</groupId>
   <artifactId>spring-context</artifactId>
   <version>3.1.2.RELEASE</version>

  </dependency>
  <dependency>
   <groupId>org.springframework</groupId>
   <artifactId>spring-aop</artifactId>
   <version>3.1.2.RELEASE</version>
  </dependency>
  <dependency>
   <groupId>org.springframework</groupId>
   <artifactId>spring-context-support</artifactId>
   <version>3.1.2.RELEASE</version>
  </dependency>

  <dependency>
   <groupId>cglib</groupId>
   <artifactId>cglib</artifactId>
   <version>2.2</version>
  </dependency>

 </dependencies>
</project>


Step 3: Add the applicationContext.xml spring file to "src/main/resources" folder.

<beans xmlns="http://www.springframework.org/schema/beans"
 xmlns:xsi="http://www.w3.org/2001/XMLSchema-instance" xmlns:p="http://www.springframework.org/schema/p"
 xmlns:context="http://www.springframework.org/schema/context"
 xmlns:task="http://www.springframework.org/schema/task"
 xsi:schemaLocation="
    http://www.springframework.org/schema/beans http://www.springframework.org/schema/beans/spring-beans-3.0.xsd
    http://www.springframework.org/schema/context http://www.springframework.org/schema/context/spring-context-3.0.xsd
    http://www.springframework.org/schema/task http://www.springframework.org/schema/task/spring-task-3.0.xsd">

 <context:component-scan base-package="com.mycompany" />

 <task:annotation-driven />
 
</beans>


Step 4: Define the Java classes under src/main/java/com/mycompany/app folder as shown below.

Firstly the main class App.java that bootsraps spring via applicationContext.xml.

package com.mycompany.app;

import org.springframework.context.support.ClassPathXmlApplicationContext;

/**
 * Hello world!
 */
public class App
{
    public static void main(String[] args)
    {
        ClassPathXmlApplicationContext appContext = new ClassPathXmlApplicationContext(new String[]
        {
            "applicationContext.xml"
        });
        
        AppService appService = (AppService) appContext.getBean("appService");
        
        appService.registerUser("skill");
    }
}


Secondly, the AppService.java class.

package com.mycompany.app;

import org.springframework.beans.factory.annotation.Autowired;
import org.springframework.stereotype.Service;

@Service
public class AppService
{
    
    @Autowired
    private EmailSender mailUtility;
    
    public void registerUser(String userName)
    {
        System.out.println(Thread.currentThread().getName());
        System.out.println("User registration for  " + userName + " complete");
        
        mailUtility.sendMail(userName);
        
        System.out.println("Registration Complete. Mail will be sent asynchronously.");
    }
}


Finally, EmailSender that runs asynchronously with the @Async annotation.

package com.mycompany.app;

import org.springframework.scheduling.annotation.Async;
import org.springframework.stereotype.Component;

@Component
public class EmailSender
{
    @Async
    public void sendMail(String name)
    {
        
        System.out.println(Thread.currentThread().getName());
        System.out.println("started producing email content");
        
        try
        {
            Thread.sleep(3000); //to simulate email sending
            
        }
        catch (InterruptedException e)
        {
            
            e.printStackTrace();
        }
        
        System.out.println("email sending has been completed");
        
    }
}


The out put will be

main
User registration for  skill complete
Registration Complete. Mail will be sent asynchronously.
SimpleAsyncTaskExecutor-1
started producing email content
email sending has been completed


Q. How do you know that the EmailSender runs asynchronously on a separate thread?
A. Firstly, the Thread.currentThread().getName() was added to print the thread names and you can see that the AppService runs on the "main" thread and the EmailSender runs on the "SimpleAsyncTaskExecutor-1" thread. Secondly, the Thread.sleep(3000) was added to demonstrate that "Registration Complete. Mail will be sent asynchronously." gets printed without being blocked. If you rerun the App.java again by commenting out the "@Async" annotation in "EmailSender", you will get a different output as shown below.

main
User registration for  skill complete
main
started producing email content
email sending has been completed
Registration Complete. Mail will be sent asynchronously.


As you can see, there is only one thread named "main", and the order of the output is different.

Labels:

May 29, 2013

Proxy design pattern for implementing thread safe wrappers


Q. What are the different ways you can make an object thread-safe?
A
  • Synchronize critical sections:  An object's critical sections are those methods or blocks of code within methods that must be executed by only one thread at a time. By using Java's synchronized keyword, you can guarantee that only one thread at a time will ever execute the object's critical sections.
  • Make the object immutable. Immutable objects are, by their very nature, thread-safe simply because threads have to be able to write to an object's instance variables to experience a read/write or write/write conflict. 
  • Use a thread-safe wrapper: by applying the proxy design pattern. let's have a look at an example.


Step 1: Here are the sample third party interface and implementation classes.

Here is the Interface

package com.arul;

public interface ThirdPartyInterface
{
    abstract void someMethod();
}


Here is the implementation

package com.arul;

public class ThirdPartyImpl implements ThirdPartyInterface
{
    
    private int someVar = 0;
    
    @Override
    public void someMethod()
    {
        //some not thread safe functionality
        System.out.println("Printing .........." + ++someVar);
    }
    
}

Step 2: Here is the testing of original third-party library to prove that it is not thread-safe.

package com.arul;

public class TestThreadSafeThirdParty implements Runnable
{
    
    private ThirdPartyInterface tstp = null;
    
    public TestThreadSafeThirdParty(ThirdPartyInterface tstp)
    {
        this.tstp = tstp;
    }
    
    public static void main(String[] args)
    {
        ThirdPartyImpl localTp = new ThirdPartyImpl();
        
        TestThreadSafeThirdParty test = new TestThreadSafeThirdParty(localTp);
        
        //create 2 threads
        Thread thread1 = new Thread(test);
        Thread thread2 = new Thread(test);
        thread1.start();
        thread2.start();
        
    }
    
    @Override
    public void run()
    {
        for (int i = 0; i < 5; i++)
        {
            tstp.someMethod();
        }
        
    }
}


The output of the above run is not thread-safe as shown below

Printing ..........1
Printing ..........3
Printing ..........2
Printing ..........4
Printing ..........5
Printing ..........6
Printing ..........7
Printing ..........9
Printing ..........8
Printing ..........10


Step 3: Here is the thread safe implementation that acts as a proxy to the subject, and its responsibility is to add thread-safety.

package com.arul;

/**
 * proxy class that applies thread safety to
 */
public class ThreadSafeThirdPartyImpl implements ThirdPartyInterface
{
    
    private final Object lock = new Object();
    private final ThirdPartyInterface subject;
    
    public ThreadSafeThirdPartyImpl(ThirdPartyInterface subject)
    {
        this.subject = subject;
    }
    
    @Override
    public void someMethod()
    {
        //lock to provide thread safety via this proxy class
        synchronized (lock)
        {
            try
            {
                Thread.sleep(200);
            }
            catch (InterruptedException e)
            {
                e.printStackTrace();
            }
            
            subject.someMethod(); //access the unsafe method
        }   
    } 
}

Step 4: Here is the testing of proxied third-party library to prove that it is now thread-safe.

package com.arul;

public class TestThreadSafeThirdParty implements Runnable
{
    
    private ThirdPartyInterface tstp = null;
    
    public TestThreadSafeThirdParty(ThirdPartyInterface tstp)
    {
        this.tstp = tstp;
    }
    
    public static void main(String[] args)
    {
        ThirdPartyImpl localTp = new ThirdPartyImpl();
        ThreadSafeThirdPartyImpl localTsTp = new ThreadSafeThirdPartyImpl(localTp);
        
        TestThreadSafeThirdParty test = new TestThreadSafeThirdParty(localTsTp);
        
        //create 2 threads
        Thread thread1 = new Thread(test);
        Thread thread2 = new Thread(test);
        thread1.start();
        thread2.start();
        
    }
    
    @Override
    public void run()
    {
        for (int i = 0; i < 5; i++)
        {
            tstp.someMethod();
        }
        
    }
}

The output of the above run is now thread-safe as shown below. Thanks to the proxy class that applies the lock.

Printing ..........1
Printing ..........2
Printing ..........3
Printing ..........4
Printing ..........5
Printing ..........6
Printing ..........7
Printing ..........8
Printing ..........9
Printing ..........10


Other design patterns - real life examples

Labels:

Unix emulator, SSH client and much more for Win32 platform

Unix for software developers

1.Top 17 Unix commands Java developers use frequently 2.History commands 3.Shell scripting 4. Reading from a file
5.Purging older files 6.Splitting and archiving files 7.Emulator, SSH client 8.Unix commands for developers 9.Unix basic interview Q&A

Many industrial Java applications are developed om a WIN32 platfor, but run on a target platform, which is Unix based. If you are a beginner to Unix, and would like to work on an emulator that runs on a Win32 platform, this post is for you. MobaXterm is a set of Unix commands (GNU/Cygwin) included in a single portable exe file. MobaXterm integrates an X server and several network clients (SSH, RDP, VNC, telnet, rlogin, sftp, ftp, ...) accessible through a tab-based terminal.


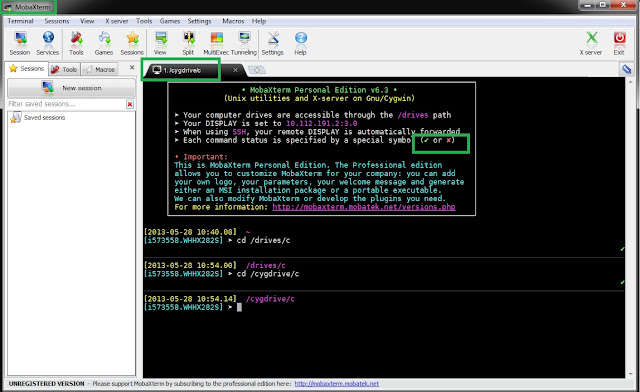
Step 1: Download MobaXterm from http://mobaxterm.mobatek.net/ for a personal use, that is learning to use Unix. Get the portable edition. This is zip file and extract the MobaXterm_Personal_.exe to a subfolder of your choice and then create a short-cut. Double clicking on the short-cut will bring up the MobaXterm window as shown below. Once it is launched, you will also see an ini file created named "MobaXterm.ini".


Step 2: Now, you can change to your C drive in Win32. One of two ways  as shown below:

1. cd /drives/c
2. cd /cygdrive/c


Step 3: You can now use this to practice the Unix posts from this and other blogs or books to enhance your Unix skills.

If you already had set up JAVA_HOME environment variable, you can echo it as shown below

echo $JAVA_HOME

If you want to set up the environment variables

export JAVA_HOME=/drives/c/FAST/JDK/1.6.0.31

export M3_HOME=/drives/c/FAST/apache-maven-3.0.4


Note: MobaXterm allows you to add number of other plugins from their web site like ksh shell, etc. All you have to do is download the plugin from the plugins tab in their website into your folder where the exe file is. Also be aware that Unix does not have the carriage return characters ( use dos2unix to convert dos files to Unix files) and also Unix files can't have spaces in between their names.

Step 4:  You can set up setenv.sh bash script to set up your Java environment as shown below

#!/bin/sh

JAVA_HOME=/drives/c/FAST/JDK/1.6.0.31
export JAVA_HOME

M3_HOME=/drives/c/FAST/apache-maven-3.0.4
export M3_HOME

Step 5: you can run the above script as

sh setenv.sh

For running in debug mode use -x

sh -x setenv.sh

Step 6: In Unix, you can use the Vi editor as your editor, and MobaXterm comes with VIM (Vi IMproved) editor.

vi test.txt


Step 7:You can query the current directory as shown below

pwd

and query the files and folders in it as

ls -ltr


Practice what ever commands you like to learn like

hostname
whoami
date 


Note:

  • Unix systems have no central place like the Windows registry for storing configuration information. Instead, Unix configuration is spread over a fair number of different files. Many of these files live in a directory called /etc : the list of users is in a file called /etc/passwd, while the name of the machine is typically found in /etc/host.
  • On Unix machines, programs cannot use network ports less than 1024. Only the special root user can use these ports.
  • There is no file locking in Unix, so you can delete the file while it is executing, and it will continue to exist as long as some process (Which previously opened it) has an open handle for it. The directory entry for the file is removed when you delete it, so it cannot be opened any more, but processes already using this file can still use it. Once all processes using this file terminate, the file is deleted automatically.


Labels:

May 28, 2013

SQL Interview Questions and Answers on deleting records


The following is a very popular SQL job interview question.

Q. What is the difference between "Truncate" and "Delete" commands?
A
  • TRUNCATE TABLE_NAME always locks the table and page but not each row, whereas  DELETE statement is executed using a row lock, each row in the table is locked for deletion.
  • Truncate removes all the records in the table whereas delete can be used with WHERE clause to remove records conditionally. That is remove only a handful number of records.
  • Truncate performance is much faster than Delete, as its logging is minimal wheres the Delete command logs every record.
  • Truncate does not retain the identity, whereas DELETE command retains the identity. When you use Truncate, If the table contains an identity column, the counter for that column is reset to the seed value that is defined for the column.
  • Truncate cleans up the object statistics and clears the allocated space whereas Delete retains the object statistics and allocated space.
  • TRUNCATE is a DDL (Data Definition Language) and DELETE is a DML (Data Manipulation Language). 
  • Data removed by TRUNCATE command cannot be generally rolled back unless the database server specifically supports it. The DELETE command can rollback a transaction.
  • The TRUNCATE command does not fire any triggers, whereas the DELETE command fires any triggers defined on the table. For example, to keep an audit trail of records that have been deleted by inserting the deleted records into an audit table via the DELETE triggers.

Q. When will you use a truncate command?
A.TRUNCATE is useful for purging a table with huge amount of data. Alternatively, you can drop the table and recreate it that makes sense. Firing a delete command instead of a truncate command to empty a table with millions of records can result in locking the whole table and also can take longer time to complete, and at times cause the machine to hang.

The truncate command is executed as shown below.

TRUNCATE TABLE table_name


Q. Which command will you use to periodically purge data from your tables as part of a house keeping job?
A.  Use a DELETE command within a transaction with a WHERE clause to remove data that are older than 7 years. Remove  large amount of data in batches as opposed to in a single transaction.

Q. How will you delete a few records from single table
A.

DELETE FROM parent p WHERE p.parent_name = 'Peter'


Q
. How will you delete a few records from parent and child tables where the parent table with parent_name = 'Peter'?
A.

Firstly, you need to delete the child records because the integrity constraint won't let you delete the parent record when there are child records.

DELETE child

FROM  parent p, child c

WHERE p.parent_id = c.parent_id

  AND p.parent_name = 'Peter'


Now, the parent table can be deleted as shown below

DELETE FROM  parent p WHERE p.parent_name = 'Peter'


Note: Please note the difference in syntax when you make a join with the child. When there is only a single table involved, it is "DELETE FROM table_name", but when there is a join, it is "DELETE table_name" and then the "FROM" with the join clauses.


Q.  What do you do with the PURGE command?
A. The purge command is used to clear the recycle bin. It is generally used with the DROP command. For example,

drop table tablename purge;


the above  command will clear away the table from database as well as from the recycle bin. After executing  the purge command, you cannot retrieve the table using a flashback query. 


You may also like:

Labels:

May 27, 2013

Unix Interview Questions: splitting and archiving files

Unix for software developers

1.Top 17 Unix commands Java developers use frequently 2.History commands 3.Shell scripting 4. Reading from a file
5.Purging older files 6.Splitting and archiving files 7.Emulator, SSH client 8.Unix commands for developers 9.Unix basic interview Q&A

Q. Can you write a Unix script that archives files that are older tahn 7 days from a folder say /data/csv? The number of files in the folder /data/csv needs to be split into a group of 10 files. For example, if you had 25 *.csv files under the folder /data/csv, 3 tar files containing 10, 10, and 5 will be created.

A. Firstly, define a configuration file that contains the source dir, archive dir, how many days old, and split size. For example

zip.cfg file

/cygdrive/c/data/csv         /cygdrive/c/data/csv/zip     +7    10


Now, the shell script zip.sh file that reads the zip.cfg and archives the files.

#!/bin/ksh

TODAY=`date '+%Y%m%d'`
SPLITPREFIX="/cygdrive/c/temp/abcdef_split"

#routine to split files in batch of say 10 and archive them
splitandzip () {
      rm $SPLITPREFIX*
      echo "cd $1; ls  | split -l $2 - $SPLITPREFIX; counter=1"
      cd $1; ls  | split -l $2 - $SPLITPREFIX; counter=1
      ls -l $SPLITPREFIX*
      cat $SPLITPREFIX*
      
      # This loop returns all files in the 'targetdir' directory; sed removes any leading ./ sequences
      for FILENAME in $(/usr/bin/find $SPLITPREFIX* | sed 's/^\.\///'); do
        cat  $FILENAME | xargs echo
           cat $FILENAME  | xargs tar -cvf $1$TODAY'_'$counter'.tar'
     cat $FILENAME | xargs rm -f
           ((counter=counter+1))
      done
}

CFG=$1
echo "Reading config file..... "$CFG

SCRIPTDIR=`pwd`

while read SOURCEDIR TARGETDIR WAITTIME SPLITSIZE
do
     ARCHIVEDIR="$TARGETDIR$TODAY/"
     mkdir $ARCHIVEDIR
     echo  " housekeeping....." $SOURCEDIR $ARCHIVEDIR $WAITTIME $SPLITSIZE
     cd $SOURCEDIR
  #move the files that are older than x days into the archive dire
  find  .  -name . -o -type f  -prune -type f -mtime $WAITTIME -exec mv {} $ARCHIVEDIR \;  ;cd $SCRIPTDIR
     splitandzip $ARCHIVEDIR $SPLITSIZE
done < $CFG


Finally, you run the above script as shown below.

sh logs_zip.sh hk_zip.cfg


The commands used above are

Split command

ls  | split -l 2 - split_prefix


-l: number of files
 -: input file is from the standard input
The last argument is the split file name.

The "ls" list the file names and the split command takes 2 file names at a time and creates files with names like split_prefixaa, split_prefixab, split_prefixac, etc and these files contains maximum 2 names from the ls. For example

File split_prefixab contents

my_file1.csv
myfile2.csv


Find command


find  .  -name . -o -type f  -prune -type f -mtime +2 -exec mv {} /out/archive \;


-name : anything
-type: file
-o: Boolean OR
-mtime : older than 2 days
-exec: execute mv command
{} : selected files to the archive folder /out/archive


Xargs Command


ls  | xargs tar -cvf test.tar'


'ls' (i.e. list) the file names in the current directory, and xargs loops through each listed file and adds it to the tar file test.tar that it creates with the -c option.


More...

In the above example, it has been used as shown below for each split file. The sed command is used to substitute ./ with /

     for FILENAME in $(/usr/bin/find $SPLITPREFIX* | sed 's/^\.\///'); do
        cat  $FILENAME | xargs echo
           cat $FILENAME  | xargs tar -cvf $1$TODAY'_'$counter'.tar'
     cat $FILENAME | xargs rm -f
           ((counter=counter+1))
      done


SCRIPTDIR=`pwd`


`pwd` means, execute the pwd command to list the present working directory and store the value into a variable name SCRIPTDIR.

The following code reads each line from the zip.cfg file, which has 4 fields separated by spaces.

 while read SOURCEDIR TARGETDIR WAITTIME SPLITSIZE
 do

  #....do somrthing here

  done < zip.cfg


Note: If you are running on Window, you can practice the above code by downloading the MobaXterm, which is a free Unix emulator for Windows. You need to download the files MobaXterm_Personal_5.0.exe, MobaXterm.ini, and for the korn shell download the plugin Pdksh.mxt3. Put all this files under a same folder and create a short-cut for MobaXterm_Personal_5.0.exe to start the MobaXterm window.

Labels:

May 24, 2013

Java new I/O Interview Questions and Answers


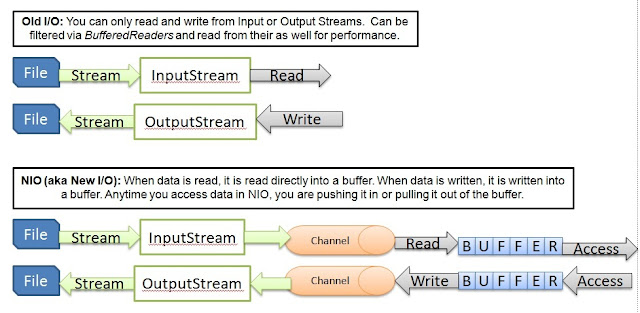
The Java New IO is very powerful and it is all about performance!, performance!!, and performance!!!. But, you need to get your head around how the buffers work. Here are some questions and answers that will help you do that. Q. How does the Java NIO (i.e New IO) introduced in Java version 1.4 differ from the old IO?
A. The NIO is all about better performance.

IO NIO (New IO)
Stream oriented. This means that you read one or more bytes at a time, from a stream. What you do with the read bytes is up to you. They are not cached anywhere. Furthermore, you cannot move forward and back in the data in a stream. If you need to move forward and back in the data read from a stream, you will need to buffer yourself first.

Buffer oriented. This means better performance. Data is read into a buffer from which it be processed later. You can move forward and back in the buffer. This gives you a bit more flexibility during processing. However, you also need to check if the buffer contains all the data you need in order to fully process it.
Blocking IO. This means when a thread invokes a read() or write(), that thread is blocked until there is some data to read, or the data is fully written. The thread can do nothing else in the meantime.

Non blocking IO. This means better performance. NIO's non-blocking mode enables a thread to request reading data from a channel, and only get what is currently available, or do nothing at all, if no data is currently available. Rather than remain blocked until data becomes available for reading, the thread can proceed with doing something else.
You need to create additional threads to read and write data in parallel. More threads means more CPU context switching and consuming more thread stacks. Selectors.  This also means better performance. NIO's selectors allow a single thread to monitor multiple channels of input. You can register multiple channels with a selector, then use a single thread to "select" the channels that have input available for processing, or select the channels that are ready for writing. This selector mechanism makes it easy for a single thread to manage multiple channels. This is also known as multiplexing. The Apache MINA package is based on Java NIO to write high performance networking applications. For example, a TCP server.

Here is the diagrammatic overview:


Q. How do you manipulate the buffer in NIO?
A. The NIO buffer  has following 3 state variables -- position, limit, and capacity

  • position: The position value keeps track of how much you have gotten from the buffer. It specifies from which array element the next byte will come. Thus, if you've written 1 bytes as shown below with shaded area to a channel from a buffer, that buffer's position will be set to 1 (starting from 0), referring to the second element of the array as shown in the diagram.
  • limit: The limit variable specifies how much room there is left to put data into -- in the case of reading from a channel into a buffer or how much data there is left to get -- in the case of writing from a buffer into a channel. The position is always less than, or equal to, the limit. The limit is 3 (counting from 0) in the diagram below.
  • capacity:  The capacity of a buffer specifies the maximum amount of data that can be stored in the underlying array. The limit can never be larger than the capacity. The capacity is 6 (counting from 0) in the diagram below.

In the above diagram, the position starts with 0, and after reading 1 byte, it becomes 1 byte, and the limit value of 3 states that there are 2 more bytes to be read. 


Q. What do you understand by terms flip( ) and clear( ) in NIO?
A.

Flip

When you are ready to write your data to an output channel. You must call the flip() method. This method does two key things:

1. It sets the limit to the current position.
2. It sets the position to 0.

You are now ready to begin writing data to a channel from the buffer starting from 0 to the limit.


Clear

After you have done your writes, the final step is to call the buffer's clear() method. This method resets the buffer in preparation for receiving more bytes. Clear does two key things:

1. It sets the limit to match the capacity.
2. It sets the position to 0.


Also, the get and put methods are used to get and put data to and from the buffer respectively. some coding examples are discussed in Java I/O interview Questions and Answers.


Q. What is in the NIO.2 package introduced in Java 7?
A. The more New I/O APIs for the Java Platform (NIO.2) in Java 7 enhance the New I/O APIs (NIO) introduced in Java 1.4 by adding

  • The four asynchronous channels to the java.nio.channels package. 
  •  The java.io.File class is upgraded to the java.nio.file.Path that allows logical manipulating of paths in memory without accessing the file system.
  • The NIO.2 associates the notion of metadata like is hidden, is it a directory, size, access control, etc with attributes and provides access to them through the java.nio.file.attribute package. Since different file systems have different notions about which attributes should be tracked, NIO.2 groups the attributes into views, each of which maps to a particular file system implementation.
  • The NIO.2 provides support for both hard links and symbolic links and the Path class knows how to detect a link and will behave in the default manner if no configuration of behavior is specified.
  • The NIO.2 comes with a set of brand new methods for managing files and directories, such as create, read, write, move, delete, and so on. The most of these tasks are found in the java.nio.file.Files class.
  • The FileVisitor interface introduced in Java 7 makes recursing through directories and files a breeze.
  • The Watch Service API was introduced in Java 7 (NIO.2) as a thread-safe service that is capable of watching  a directory for changes to its content through actions such as create, delete, and modify. This means, with NIO.2, you no longer need to poll the file system for changes or use other in-house solutions to monitor the file system changes.
  • Java 7 (NIO.2) introduces a new interface for working with Random Access Files with its SeekableByteChannel and an interface named NetworkChannel that provides network channel classes for tetworking.

Labels:

May 23, 2013

Writing cross platform compatible Java code


Java is cross platform language in the sense that a compiled Java program runs on all platforms for which there exists a JVM like Windows, Mac OS and Unix. Having said this, there are scenarios where the Java programmers need to code things carefully. Experienced Java programmers will be well placed to answer the following question.


Q. Can you list some of the cross platform issues that a Java programmer needs to be mindful of based on your experience?
A.

1. Carriage return and new line characters across different platforms.

If you are processing file like a CSV file and you need to parse the text line by line you need to be aware of the new line characters across different operating systems.

Windows: \r\n 
Unix: \n 
Mac: \r


Here is an example of the split function in Java that will work across different platforms. In Java extra "\" is used as an escape character.

  String[] split = fileInput.split("\\r?\\n");


There are other areas like in the formatter classes

String s2 = String.format("Use %%n as a platform independent newline.%n"); 


You can also get the line separator via

System.getProperty("line.separator");


and in Java 7

System.lineSeparator() ;


2. The File path separator

The Windows uses "\" and the Unix systems use the "/" as the file path separator. So, you need to be careful construction file paths like

File file = new File(parentDirectory + "\" + resourceDirectory + "\" + fileName);


Instead, you should use 

File file = new File(parentDirectory + File.separator  + resourceDirectory +  File.separator  + fileName);


The File.separator will take care of the cross platform compatibility by using correct separator for the platform. What is even better is to nest your File construction with the "public File(String parent, String child)" constructor.

File dir = new File(parentDirectory, resourceDirectory);
File file = new File(fileName);
File finalFile = new File(dir, file);


3. Threading priorities

Threading priorities is another thing to consider across platforms. Other OS like Solaris for example has more thread priorities than windows. So, if you are working heavily on multi-threading, OS is something that may affect the program's behavior.

4. Using Native Code

Using native code (via JNI) can cause cross platform issues.

5. Beware of the System class

System.getProperty("os.name") is clearly OS dependent. The other most common one is System.exec() as it calls another application from your system, and you should know if the application you are calling works across other systems.


Even though Java is touted to be a Write Once Run Anywhere (WORA) type programming language, one needs to be aware of the above potential issues and test it properly across other platforms. Watch out for these gotchas in code reviews. 

6. Character sets 

When converting bytes to String or reading a file in different environments, it is imperative that we use the right character sets. Otherwise, you can have cross platform issues like character displayed properly in a Win32 platform, but not in a Unix platform and vice versa.

So, instead of

String str = new String(bytes);


Use with proper character encoding like

String str = new String(bytes, "utf-8");

Also, instead of

   FileInputStream fis = new FileInputStream("specialcharacters.txt");  
   InputStreamReader irs = new InputStreamReader(fis);  
   ... 


   FileInputStream fis = new FileInputStream("specialcharacters.txt");  
   InputStreamReader irs = new InputStreamReader(fis,"utf-8");  
   ... 


You can also set it via JVM runtime argument as shown below

java MyApp -Dfile.encoding=ISO-8859-1


Recently UTF-8 has become the default encoding on many systems, but sometimes you have to deal with files originating from older systems with other encodings. ASCII is an encoding that uses 7 bits in mapping all US characters in saving the bytes into file. The UTF-8 was designed for backward compatibility with ASCII and to avoid the complications of endianness and byte order marks in UTF-16 and UTF-32The most useful and practical file encoding today is "UTF-8" because it support Unicode, and it's widely used in internet. UTF-8 encodes each of the 1,112,064 code points in the Unicode character set using one to four 8-bit bytes. The UTF-8 has become the dominant character encoding for the World-Wide Web.

Labels: ,

May 22, 2013

JMeter for testing RESTFul web services by posting JSON data and how to use BeanShell


We looked at JMeter tutorial with detailed steps in an earlier tutorial. This is a brief extension to cover JSON post. Now a days, a single page interactive web sites are very popular, and they post JSON based data back to the server to create a new record or to update an existing record.

Step 1: Firstly, you need to set up the header "Content-Type" to "application/json" as shown below.


Step 2: Specify the URL path and paste the relevant JSON data that gets posted as shown below.
 Also, make sure that the HTTP verb used ia a "POST".


Now, there will be scenarios where posting a static JSON data is not good enough, and you will require to manipulate the JSON data. Here are steps to acheve this with

BeanShell Sampler and BeanShell PostProcessor to manipulate JSON data within JMeter

Step 1: Download a Java based JSON library jar to encode and decode JSON data. In this example, I am using the json-simple library that can be downloaded from code-google.

Step 2: Copy the downloaded jar file "json-simple-x.x.x.jar" to JMeter lib folder C:\myapps\apache-jmeter-2.9\lib.

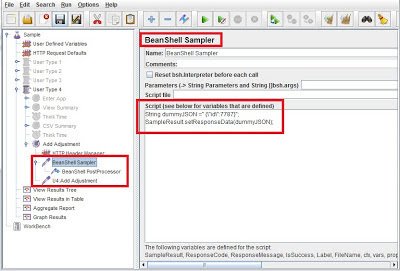
Step 3: Restart the JMeter. Add a Bean Shell Sampler by right clicking and then selecting Add --> Sampler --> Bean Shell Sampler.

To the Bean Shell sampler add a sample static JSON data as shown below, which we would manipulate in the next step.


String dummyJSON =" {\"id\":7787}";
SampleResult.setResponseData(dummyJSON);


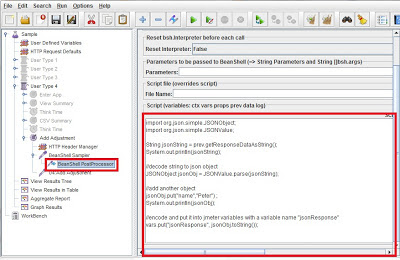
Step 4: Now, add Bean Shell Processor as a child as shown above in the diagram, and the code will use the library we added in step 1.

import org.json.simple.JSONObject;
import org.json.simple.JSONValue;

String jsonString = prev.getResponseDataAsString();
System.out.println(jsonString);

//decode string to json object
JSONObject jsonObj = JSONValue.parse(jsonString);

//add another object
jsonObj.put("name","Peter") ;
System.out.println(jsonObj);

//encode and put it into jmeter variables with a variable name "jsonResponse"
vars.put("jsonResponse", jsonObj.toString());


Step 5: Finally, in the HTTP sampler, use the variable "jsonResponse", which has the dynamically created (or modified) jsonResponse as a variable. For example: ${jsonResponse}.


That's all to it. It has not only demonstrated how to manipulate JSON data, but also how to use Bean Shell to add coding power and flexibility to JMeter.

Labels: , ,

May 21, 2013

Java I/O -- the Decorator and proxy design pattern interview questions and answers


Q. Can you explain the decorator design pattern?
A. By implementing the decorator pattern you construct a wrapper around an object by extending its behavior. The wrapper will do its job before or after and delegate the call to the wrapped instance. The decoration happens at run-time. In Java, the wrapper classes like Integer, Double, etc are typical example of a decorator pattern. Another good example is the Java I/O classes as shown below. Each reader or writer will decorate the other to extend or modify the behavior.

String inputText = "Some text to read";
ByteArrayInputStream bais = new ByteArrayInputStream(inputText.getBytes());
Reader isr = new InputStreamReader(bais);
BufferedReader br = new BufferedReader(isr);
br.readLine(); 


As you can see, each reader extends the behavior at run-time. This is the power of object composition as opposed to inheritance. By composing a fewer classes at run-time, desired behavior can be created. Here is another example demonstrating an interleaved reading using a class from the Apache library.

import java.io.*;
import org.apache.commons.io.input.TeeInputStream;

class InterleavedReadingFromFile {
    public static void main(String[] args) throws IOException {

        // Create the source input stream.
        InputStream is = new FileInputStream("c:\temp\persons.txt");

        // Create a piped input stream for one of the readers.
        PipedInputStream in = new PipedInputStream();

        // Create a tee-splitter for the other reader. This is from the Apache library
        TeeInputStream tee = new TeeInputStream(is, new PipedOutputStream(in));

        // Create the two buffered readers.
        BufferedReader br1 = new BufferedReader(new InputStreamReader(tee));
        BufferedReader br2 = new BufferedReader(new InputStreamReader(in));

        // You can now do interleaved reads
        System.out.println("1 line from br1");
        System.out.println(br1.readLine());


        System.out.println("2 lines from br2:");
        System.out.println(br2.readLine());
        System.out.println(br2.readLine());
        System.out.println();

        System.out.println("1 line again from br1:");
        System.out.println(br1.readLine());
        System.out.println();
  
   }
}


Q. Can you write a class using the decorator design pattern to print numbers from 1-10, and then decorators that optionally print only even or odd numbers?
A. Java decorator pattern


Q. How does a decorator design pattern differ from a proxy design pattern?
A. In Proxy pattern, you have a proxy and a real subject. The relationship between a proxy and the real subject is typically set at compile time, whereas decorators can be recursively constructed at run time. The Decorator Pattern is also known as the Wrapper pattern. The Proxy Pattern is also known as the Surrogate pattern. The purpose of decorator pattern is to add additional responsibilities to an object. These responsibilities can of course be added through inheritance, but composition provides better flexibility as explained above via the Java I/O classes. The purpose of the proxy pattern is to add an intermediate between the client and the target object. This intermediate shares the same interface as the target object. Here are some scenarios in which a proxy pattern can be applied.

  • A remote proxy provides a local representative for an object in a different address space.Providing interface for remote resources such as web service or REST resources or EJB using RMI.
  • A virtual proxy creates expensive object on demand.
  • A protection proxy controls access to the original object.Protection proxies are useful when objects should have different access rights.
  • A smart reference is a replacement for a bare pointer that performs additional actions when an object is accessed.
  • Adding a thread-safe feature to an existing class without changing the existing class's code. This is useful when you do not have the freedom to fix thread-safety issues in a third-party library.
The proxy design pattern is explained with a dynamic proxy class to gather performance results in the blog entitled  Java Interview Questions and Answers - performance testing your Java application.


Q. Can you list some of the best practices relating to Java I/O
A.
  1. As demonstrated in Java I/O interview Questions, it is a good practice to close all instances of java.io.Closeable in a finally block.
  2. Use BufferedReader and BufferedWriter to increase efficiency because IO performance depends a lot from the buffering strategy. 
  3. Favor NIO over old IO because the old I/O is stream oriented and uses a blocking IO, whereas the NIO (aka New IO) is Buffer oriented, uses Non blocking I/O and has selectors. 
  4. To avoid issues like "the file reading works in Windows but not in Unix", use java.io.File constructors instead of working with file names as String. The FilenameUtils class in Apache. commons IO handles issues relating to operating systems. 
  5. Apache FileUtils class is  very handy for touching, copying, moving, deleting, calculating the checksum, calculating last modified date, listing and filtering directories, comparing file content, etc.


Other design patterns - real life examples

Labels: ,

Java Coding Interview Questions on decorator and composition design pattern


Q. When would you use a decorator design pattern?
A. The Decorator pattern should be used when:
  •     Object responsibilities and behaviors should be dynamically modifiable
  •     Concrete implementations should be decoupled from responsibilities and behaviors

Q. Can you write a class using the decorator design pattern to print numbers from 1-10, and then decorators that optionally print only even or odd numbers?
A. This can be done by sub classing or via inheritance. But too much sub classing is definitely a bad thing. Composition is more powerful than sub classing as you can get different behaviors via decorating at run time. Here is the code, you will realize the power of object composition and why GoF design patterns favors composition to inheritance.


Step 1: Define the interface class.

package com.arul;

public interface NextNumber
{
    abstract int getNextNumber();
}


Step 2: Define the implementation classes. The class that gets the numbers.

package com.arul;

public class PrintNumbers implements NextNumber
{
    protected int num;
    
    public PrintNumbers(int num)
    {
        this.num = num;
    }
    
    @Override
    public int getNextNumber()
    {
        return ++num; // incremented, assigned, and then returned
    }
    
}

Step 3: The class that gets the odd numbers.

package com.arul;

public class PrintOddNumbers implements NextNumber
{
    
    protected final NextNumber next;
    
    public PrintOddNumbers(NextNumber next)
    {
        if (next instanceof PrintEvenNumbers)
        {
            throw new IllegalArgumentException("Cannot be decorated with " + PrintEvenNumbers.class);
        }
        this.next = next;
        
    }
    
    @Override
    public int getNextNumber()
    {
        int num = -1;
        
        if (next != null)
        {
            
            num = next.getNextNumber();
            //keep getting the next number until it is odd
            while (num % 2 == 0)
            {
                num = next.getNextNumber();
            }
        }
        
        return num;
    }
    
}


Step 4: The class that gets the even numbers

package com.arul;

public class PrintOddNumbers implements NextNumber
{
    
    protected final NextNumber next;
    
    public PrintOddNumbers(NextNumber next)
    {
        if (next instanceof PrintEvenNumbers)
        {
            throw new IllegalArgumentException("Cannot be decorated with " + PrintEvenNumbers.class);
        }
        this.next = next;
        
    }
    
    @Override
    public int getNextNumber()
    {
        int num = -1;
        
        if (next != null)
        {
            
            num = next.getNextNumber();
            //keep getting the next number until it is odd
            while (num % 2 == 0)
            {
                num = next.getNextNumber();
            }
        }
        
        return num;
    }
    
}

Step 5: The class that gets the multiples of 3s

package com.arul;

public class PrintMultipleOfThreeNumbers implements NextNumber
{
    
    protected final NextNumber next;
    
    public PrintMultipleOfThreeNumbers(NextNumber next)
    {
        this.next = next;
    }
    
    @Override
    public int getNextNumber()
    {
        int num = -1;
        
        if (next != null)
        {
            
            num = next.getNextNumber();
            //keep getting the next number until it is odd
            while (num % 3 != 0)
            {
                num = next.getNextNumber();
            }
        }
        
        return num;
    }
    
}


Step 6:  Finally, a  sample file that shows how the above classes can be decorated at run time using object composition to get different outcomes. Additional  implementations of NextNumber  like PrintPrimeNumbers, PrintMultiplesOfSevenPrintFibonacciNumber, etc can be added using the Open-Closed design principle.

package com.arul;

public class TestNumbersWithDecorators
{
    public static void main(String[] args)
    {
        
        //without decorators
        PrintNumbers pn = new PrintNumbers(0);
        for (int i = 0; i < 10; i++)
        {
            System.out.print(pn.getNextNumber() + " "); // print next 10 numbers
        }
        
        System.out.println();
        
        PrintNumbers pn2 = new PrintNumbers(0);
        //print odd numbers with decorators
        PrintOddNumbers pOdd = new PrintOddNumbers(pn2); // decorates pn2
        for (int i = 0; i < 10; i++)
        {
            System.out.print(pOdd.getNextNumber() + " "); //print next 10 odd numbers
        }
        
        System.out.println();
        
        PrintNumbers pn3 = new PrintNumbers(0);
        //print even numbers with decorators
        PrintEvenNumbers pEven = new PrintEvenNumbers(pn3); // decorates pn3
        for (int i = 0; i < 10; i++)
        {
            System.out.print(pEven.getNextNumber() + " "); //print next 10 even numbers
        }
        
        System.out.println("");
        
        PrintNumbers pn4 = new PrintNumbers(0);
        //print odd numbers with decorators
        PrintOddNumbers pOdd2 = new PrintOddNumbers(pn4); // decorates pn4
        //print multiples of 3 with decorators
        PrintMultipleOfThreeNumbers threes = new PrintMultipleOfThreeNumbers(pOdd2); // decorates pOdd2
        for (int i = 0; i < 10; i++)
        {
            System.out.print(threes.getNextNumber() + " "); // print next 10 odd numbers
                                                            // that are multiple of threes
        }
        
        System.out.println("");
        
        PrintNumbers pn5 = new PrintNumbers(0);
        //print even numbers with decorators
        PrintEvenNumbers pEven2 = new PrintEvenNumbers(pn5); // decorates pn5
        //print multiples of 3 with decorators
        PrintMultipleOfThreeNumbers threes2 = new PrintMultipleOfThreeNumbers(pEven2); // decorates pEven2
        
        for (int i = 0; i < 10; i++)
        {
            System.out.print(threes2.getNextNumber() + " ");  // print next 10 even numbers
                                                             // that are multiple of threes
        }
        
        System.out.println("");
        
        PrintNumbers pn6 = new PrintNumbers(0);
        //print multiples of 3 with decorators
        PrintMultipleOfThreeNumbers threes3 = new PrintMultipleOfThreeNumbers(pn6); // decorates pn6
        //print even numbers with decorators
        PrintEvenNumbers pEven3 = new PrintEvenNumbers(threes3); // decorates threes3
        
        for (int i = 0; i < 10; i++)
        {
            System.out.print(pEven3.getNextNumber() + " ");  // print next 10 multiple of threes
                                                            // that are even numbers
        }
        
    }
}

The output of running the above class is

1 2 3 4 5 6 7 8 9 10 
1 3 5 7 9 11 13 15 17 19 
2 4 6 8 10 12 14 16 18 20 
3 9 15 21 27 33 39 45 51 57 
6 12 18 24 30 36 42 48 54 60 
6 12 18 24 30 36 42 48 54 60 


Labels: , ,

May 16, 2013

Java I/O Interview Questions and Answers

Java I/O interview questions are popular with some interviewers, especially the job you are applying for requires file processing. The Java NIO (stands for New I/O) package was introduced in Java version 4 and NIO2 was released in Java version 7.

Q. Why do you need to favor NIO (i.e. New I/O) to old I/O?
A.  A stream-oriented I/O (or old I/O) deals with data one byte at a time. An input stream produces one byte of data, and an output stream consumes one byte of data. It is very easy to create filters and chain several filters together so that each one does its part in what amounts to a single, sophisticated
processing mechanism. On the flip side, stream-oriented I/O is often rather slow.

A block-oriented I/O system deals with data in blocks. The New I/O consumes a block of data in one step. Processing data by the block can be much faster than processing it by byte (i.e. streamed). But block-oriented I/O lacks some of the elegance and simplicity of stream-oriented I/O.


The examples below read the content of this file and print it to a console. In reality, you can do whatever you want once you have read it like mapping to Java POJOs, etc.

Q. Can you describe different ways in which you can read data from a file?
A. Files can be read a number of ways. Here is a sample file named person.csv in a folder c:\temp\tlm.

FirstName, Surname, Age
John,Smith, 35
Peter,John, 28
Shirley,John,34


1. The I/O way using a BufferedReader


package com.arul;

import java.io.BufferedReader;
import java.io.FileReader;
import java.io.IOException;

/**
 * This is a slower way using the old io
 */
public class ReadFileOldIOWay
{ 
    public static void main(String[] args) throws IOException
    {
        BufferedReader br = null;
        String sCurrentLine = null;
        try
        {
            br = new BufferedReader(
                    new FileReader("c:/temp/tlm/person.csv"));
            while ((sCurrentLine = br.readLine()) != null)
            {
                System.out.println(sCurrentLine); // for demo only. use log.info(...) instead
            }
        }
        catch (IOException e)
        {
            e.printStackTrace(); // quick & dirty for demo only
        }
        finally
        {
            if (br != null)
            {
                br.close();
            }       
        }
    }
}


2. The nio way using a ByteBuffer for smaller files

package com.arul;

import java.io.IOException;
import java.io.RandomAccessFile;
import java.nio.ByteBuffer;
import java.nio.channels.FileChannel;

/**
 * This is using the nio ByteBuffer for smaller files
 */
public class ReadFileWithByteBuffer
{
    public static void main(String args[]) throws IOException
    {
        RandomAccessFile aFile = null;
        try
        {
            aFile = new RandomAccessFile(
                    "c:/temp/tlm/person.csv", "r");
            FileChannel inChannel = aFile.getChannel();
            long fileSize = inChannel.size();
            ByteBuffer buffer = ByteBuffer.allocate((int) fileSize);
            inChannel.read(buffer);//read the first header line
            buffer.flip();//The limit is set to the current position
            while (buffer.hasRemaining())
            {
                System.out.print((char) buffer.get()); // for demo only. use log.info(...) instead 
            }
            
            inChannel.close();
            
        }
        catch (IOException exc)
        {
            exc.printStackTrace(); //quick & dirty for demo only
            System.exit(1);
        }
        finally
        {
            aFile.close();
        }
    }
}


3. The nio way using a ByteBuffer with chunking for larger files


package com.arul;

import java.io.IOException;
import java.io.RandomAccessFile;
import java.nio.ByteBuffer;
import java.nio.channels.FileChannel;

/**
 * This is using the nio ByteBuffer chunking for larger files
 */
public class ReadFileWithByteBufferInChunksForLargerFiles
{
    public static void main(String args[]) throws IOException
    {
        RandomAccessFile aFile = null;
        try
        {
            aFile = new RandomAccessFile(
                    "c:/temp/tlm/person.csv", "r");
            FileChannel inChannel = aFile.getChannel();
            ByteBuffer buffer = ByteBuffer.allocate(18);
            while (inChannel.read(buffer) > 0)
            {
                
                buffer.flip();
                while (buffer.hasRemaining())
                {
                    System.out.print((char) buffer.get()); // for demo only. use log.info(...) instead
                }
                buffer.clear();
            }
            
            inChannel.close();
            
        }
        catch (IOException exc)
        {
            exc.printStackTrace(); //quick & dirty for demo only
            System.exit(1);
        }
        finally
        {
            aFile.close();
        }
    }
}


4. The nio way using a MappedByteBuffer for better performance, but beware of the file size

package com.arul;

import java.io.IOException;
import java.io.RandomAccessFile;
import java.nio.MappedByteBuffer;
import java.nio.channels.FileChannel;

/**
 * This is a faster way using the nio MappedByteBuffer
 */

public class ReadFileWithMappedByteBufferWay
{
    public static void main(String[] args) throws IOException
    {
        RandomAccessFile aFile = null;
        
        try
        {
            aFile = new RandomAccessFile
                    ("c:/temp/tlm/person.csv", "r");
            FileChannel inChannel = aFile.getChannel();
            MappedByteBuffer buffer = inChannel.map(FileChannel.MapMode.READ_ONLY, 0, inChannel.size());
            buffer.load();
            for (int i = 0; i < buffer.limit(); i++)
            {
                System.out.print((char) buffer.get()); // for demo only. use log.info(...) instead
            }
            buffer.clear(); // do something with the data and clear/compact it.
            inChannel.close();
        }
        finally
        {
            aFile.close();
        }
    }
}


The output for all the above alternatives is

FirstName, Surname, Age
John,Smith, 35
Peter,John, 28
Shirley,John,34


The nio package is very efficient as it uses buffering and non blocking I/O with selectors compared to the old I/O.

Labels: ,

May 15, 2013

Spring security pre-authentication scenario - Part2

In Part 1, I covered configuring Spring security. Here we will see how we can protect the controller and the service class methods by defining what roles are allowed.


Firstly, you can protect your controller as shown below.


Define the URLs to be protected in the ssoContext.xml file something like

<http auto-config="false" access-decision-manager-ref="springAccessDecisionManager" 
  once-per-request="true" create-session="ifRequired" entry-point-ref="MyAppAuthenticationEntryPoint">
  
  <session-management invalid-session-url="/j_spring_security_logout" />
  <!-- TODO: Would be cleaner if we didn't have to enumerate every role that can access some URL in the system. Consider hierarchical roles -->
  <intercept-url pattern="/**/*.css*" filters="none" />
  <intercept-url pattern="/**/*.js*" filters="none" />
  <intercept-url pattern="/**/*.png*" filters="none" />
  <intercept-url pattern="/**/codemapping.rpc" access="ROLE_admin,ROLE_viewer" /> 
  <intercept-url pattern="/**/generalLedgerService.rpc" access="ROLE_admin" />
  <intercept-url pattern="/**/MyAppAdjustment.html" access="ROLE_admin,ROLE_viewer" />
  <intercept-url pattern="/**/CodeMapping.html" access="ROLE_admin,ROLE_viewer" />
  <intercept-url pattern="/**/myapp_test.html" access="ROLE_admin" />
  <custom-filter ref="siteminderFilter" position="PRE_AUTH_FILTER" />
  <access-denied-handler ref="accessDeniedHandler"/> 
       
        ....    
    
</http>


In the Spring MVC controller, you can use the annotation as shown below.

   @RolesAllowed(
    {
        "ROLE_viewer", "ROLE.standard", "ROLE_senior"
    
    })
    @RequestMapping(value = "/portfolio/{portfoliocd}/details.csv", method = RequestMethod.GET, produces = "text/csv")
    @ResponseBody
    public void getCashForecastCSV(
            @PathVariable(value = "portfoliocd") String portfolioCode,
            @RequestParam(value = "valuationDate", required = true) @DateTimeFormat(pattern = "yyyyMMdd") Date valuationDate,
            HttpServletResponse response) throws Exception
    {
 
 
   //..............................
 
     }


The service class methods can be protected by declaring the following in your spring context file where the methods reside.

 <!-- comment this line locally to bypass seurity access control in development. But don't check this in commented as security will be turned off -->
 <security:global-method-security secured-annotations="enabled" pre-post-annotations="enabled" jsr250-annotations="enabled"/>


Once declared, you can protect your service class methods as shown below.

    @RolesAllowed(
    {
        "ROLE_viewer", "ROLE_standard", "ROLE_senior"
    
    })
    @Override
    public ReconciliationResult getReconciliations(ReconciliationCriteria criteria)
    {
    //........................
 }


Labels: , ,

May 9, 2013

Notepad++ plugin for viewing JSON data and other benefits

Q. Why is Notepad++ is a very handy tool?
A.  Notepad++ is a very handy developer tool. Here are some of the productivity benefits of Notepad++.

  •  to view source code as a free and light weight source code editor that runs in Windows environment. You can also use it to view log files and other text data.
  • It can be used for syntax highlighting, line numbering, search and replace with or without regular expressions, modified file detection, file search, etc. 

Working with JSON data

Recently, I had to work a lot with JSON data, and stumbled across a very handy plugin for Notepadd++ called "JSONViewer Notepad++", which allows you to format JSON data and view them as a tree structure. Here are the simple setps to install this plugin.

Step 1: Download the plugin as a zip file from the source-forge site.

Step 2: Unzip the downloaded file and extract out the "NPPJSONViewer.dll" file.

Step 3: Copy this file to the plugins folder in your Notepad++ installation folder, and restart your Notepad++. for example "c:\myapps\Notepad++\5.9\plugins".

Step 4: When you open up your Notepad++, you will see the "JSONViewer" sub menu under the "Plugins" on the top main menu. You can format the JSON text by highlighting your text first and then clicking on Plugins --> JSON Viewer --> Format JSON.


Extracting data

If you had some tab limited data like

FirstName Surname Age
John  Smith 25
Peter  Warren 35
Lisa  Jenkins 28


and if you want to extract out all the first names, you can invoke the column mode by pressing "Alt" key and then select the "FirstName" column with the mouse selection. Alternatively, you can use the "Alt+Shift+Arrow Key" to select the column entries you need. These options are under the  "Edit --> Column Mode" on the top menu.

Finding and replacing values with Regular expressions

If you have some comma delimited data as shown below

FirstName,Surname,middlename
John,Smith 
Peter,Warren,James 
Lisa,Jenkins


where the middle name is optional, and you want to convert the comma delimited data to tab delimited data.This is where Notepad++ 's regex based find and replace comes in handy.

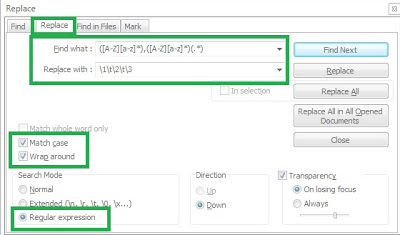
Step 1: Select "Search --> Find" from the top menu.
Step 2: click on "Replace" tab.
Step 3: Tick "Match case" if required and select "Regular Expression" option.
Step 4: Enter the relevant  regular expressionsfor the "Find What" and "Replace With".


Find What: ([A-Z][a-z]*),([A-Z][a-z]*)(.*)
Replace With: \1\t\2\t\3

Where \1, etc are groups and \t is for tab delimiting.


You can use the "Find In files" tab to replace multiple files. I use this feature to search for files that has certain text (i.e. grep). This is a bulk find and replace capability. It also has other bulk features like "File --> Save all" open files.


Split views, file comparisons and synchronized scrolling

Select  View -->  Move/Clone Current Document to create split views to compare two files side by side. On split views you can select Plugins --> Compare --> compare to highlight the differences or select View --> Synchronize Vertical Scrolling to scroll both views in tandem.


Language feature to highlight reserved key words

Setting the language of the file like Java, JavaScript, etc via Language --> J --> Java or JavaScript will help you easily visually distinguish between functions, reserved words, comments, text, and other types of symbols and expressions in your code.


The latest Notepad++ version should have a TextFx menu to tidy up HTML tags to be XHTML compliant. You can also automate any monotonous tasks you do repeatedly with the Macros. It can also synchronize files with  Subversion (i.e. SVN). Hence Notepad++ is a powerful open-source developer tool that makes you more productive.

Labels: ,

May 7, 2013

Spring security pre-authentication scenario - Part1

Spring security pre-authentication scenario assumes that a valid authenticated user is available via  either Single Sign On (SSO) applications like Siteminder, Tivoli, etc or a X509 certification based authentication. The Spring security in this scenario will only be used for authorization.

The example shown below retrieves the user name via the HTTP headers.

Step 1:  The dependency jars that are required.

 <dependency>
   <groupId>org.springframework.security</groupId>
   <artifactId>spring-security-core</artifactId>
   <version>3.1.0.RELEASE</version>
  </dependency>

  <dependency>
   <groupId>org.springframework.security</groupId>
   <artifactId>spring-security-web</artifactId>
   <version>3.1.0.RELEASE</version>
  </dependency>

  <dependency>
   <groupId>org.springframework.security</groupId>
   <artifactId>spring-security-acl</artifactId>
   <version>3.1.0.RELEASE</version>
  </dependency>

  <dependency>
   <groupId>org.springframework.security</groupId>
   <artifactId>spring-security-config</artifactId>
   <version>3.1.0.RELEASE</version>
  </dependency>


Step 2: Define the Spring security filter via the web.xml file.

     ....

    <!-- The definition of the Root Spring Container shared by all Servlets and Filters -->
 <context-param>
  <param-name>contextConfigLocation</param-name>
  <param-value>/META-INF/spring/applicationContext.xml</param-value>
 </context-param>


 <!-- Spring Security -->
 <filter>
  <filter-name>springSecurityFilterChain</filter-name>
  <filter-class>org.springframework.web.filter.DelegatingFilterProxy </filter-class>            
 </filter>
 
 <filter-mapping>
  <filter-name>springSecurityFilterChain</filter-name>
  <url-pattern>/myapp/*</url-pattern>
 </filter-mapping>
 
    ....


Step 3: The servlet filter configured above will make use of a spring context file like  ssoContext.xml to define the authorization sequences. The ssoContext file can be imported via the applicationContext.xml file bootstrapped via the web.xml file.

<?xml version="1.0" encoding="UTF-8"?>
<beans xmlns="http://www.springframework.org/schema/beans"
    xmlns:xsi="http://www.w3.org/2001/XMLSchema-instance" 
    xmlns:p="http://www.springframework.org/schema/p"
    xmlns:mvc="http://www.springframework.org/schema/mvc"
    xmlns:cache="http://www.springframework.org/schema/cache"
    xmlns:context="http://www.springframework.org/schema/context"
    xmlns:aop="http://www.springframework.org/schema/aop" 
    xmlns:jee="http://www.springframework.org/schema/jee" 
    xmlns:tx="http://www.springframework.org/schema/tx"
    xmlns:util="http://www.springframework.org/schema/util"
    xmlns:batch="http://www.springframework.org/schema/batch"
    xsi:schemaLocation="
            http://www.springframework.org/schema/beans http://www.springframework.org/schema/beans/spring-beans-3.1.xsd
            http://www.springframework.org/schema/mvc http://www.springframework.org/schema/mvc/spring-mvc-3.1.xsd
            http://www.springframework.org/schema/context http://www.springframework.org/schema/context/spring-context-3.1.xsd
            http://www.springframework.org/schema/aop http://www.springframework.org/schema/aop/spring-aop-3.1.xsd
            http://www.springframework.org/schema/tx http://www.springframework.org/schema/tx/spring-tx-3.1.xsd
            http://www.springframework.org/schema/util http://www.springframework.org/schema/util/spring-util-3.1.xsd
            http://www.springframework.org/schema/cache http://www.springframework.org/schema/cache/spring-cache-3.1.xsd">
    
    <!-- Root Context: defines shared resources visible to all other web components -->

    <context:annotation-config />
    
    <import resource="myServerContext.xml" /> 
 <import resource="security/ssoContext.xml" /> 
    
</beans>


Step 4: The ssoContext.xml is defined below showing how the user can be retrieved from HTTP header SM_USER for site minder and passed to your own implementation to retrieve the roles (aka authorities). All the classes configured below are Spring classes except for the UserDetailsServiceImpl, which is used to retrieve the authorities.

<?xml version="1.0" encoding="UTF-8"?>
<beans:beans xmlns="http://www.springframework.org/schema/security"
 xmlns:beans="http://www.springframework.org/schema/beans"
 xmlns:security="http://www.springframework.org/schema/security"
 xmlns:context="http://www.springframework.org/schema/context"
 xmlns:xsi="http://www.w3.org/2001/XMLSchema-instance"
 xsi:schemaLocation="http://www.springframework.org/schema/beans http://www.springframework.org/schema/beans/spring-beans-3.1.xsd
                   http://www.springframework.org/schema/context http://www.springframework.org/schema/context/spring-context.xsd  
                      http://www.springframework.org/schema/security http://www.springframework.org/schema/security/spring-security-3.1.xsd">


    <context:component-scan base-package="com.myapp.dao.security" />
    <context:component-scan base-package="com.myapp.model.security" />

 <beans:bean id="springVoter"
  class="org.springframework.security.access.vote.RoleVoter" />
 <beans:bean id="springAccessDecisionManager"
  class="org.springframework.security.access.vote.AffirmativeBased">
  <beans:property name="allowIfAllAbstainDecisions"
   value="false" />
  <beans:property name="decisionVoters">
   <beans:list>
    <beans:ref local="springVoter" />
   </beans:list>
  </beans:property>
 </beans:bean>


    <http auto-config="false"   entry-point-ref="preAuthenticatedProcessingFilterEntryPoint">
      <security:custom-filter position="PRE_AUTH_FILTER" ref="siteminderFilter" />
      <intercept-url pattern="/**/details.csv*" access="ROLE_viewer, ROLE_standard, ROLE_senior" /> 
      <logout logout-url="/j_spring_security_logout" logout-success-url="https://smlogin-dev.myapp.net/siteminderagent/ssologout/Logout.html" invalidate-session="true" /> 
 </http> 
 
 
 <beans:bean id="preAuthenticatedProcessingFilterEntryPoint" class="org.springframework.security.web.authentication.Http403ForbiddenEntryPoint"/>

 <beans:bean id="siteminderFilter"
  class="org.springframework.security.web.authentication.preauth.RequestHeaderAuthenticationFilter">
  <beans:property name="principalRequestHeader" value="SM_USER" />
  <beans:property name="authenticationManager" ref="authenticationManager" />
  <beans:property name="exceptionIfHeaderMissing" value="false" />
 </beans:bean>

 <security:authentication-manager alias="authenticationManager">
  <security:authentication-provider
   ref="preauthAuthProvider" />
 </security:authentication-manager>

 <beans:bean id="preauthAuthProvider"
  class="org.springframework.security.web.authentication.preauth.PreAuthenticatedAuthenticationProvider">
  <beans:property name="preAuthenticatedUserDetailsService">
   <beans:bean id="userDetailsServiceWrapper"
    class="org.springframework.security.core.userdetails.UserDetailsByNameServiceWrapper">
    <beans:property name="userDetailsService" ref="myUserDetailsService" />
   </beans:bean>
  </beans:property>
 </beans:bean>

 <beans:bean id="myUserDetailsService" class="com.myapp.UserDetailsServiceImpl">
  <beans:property name="appCd" value="appName" />
 </beans:bean>
 

</beans:beans>


Step 5: Define the class UserDetailsServiceImpl class that needs to implement the Spring interface UserDetailsService and the required method   "public UserDetails loadUserByUsername(String username)". The returned model object  "UserDetails" is a Spring class as well.

package com.myapp.security;

import java.util.ArrayList;
import java.util.Collection;

import org.slf4j.Logger;
import org.slf4j.LoggerFactory;
import org.springframework.beans.factory.annotation.Required;
import org.springframework.dao.DataAccessException;
import org.springframework.security.core.GrantedAuthority;
import org.springframework.security.core.authority.GrantedAuthorityImpl;
import org.springframework.security.core.userdetails.User;
import org.springframework.security.core.userdetails.UserDetails;
import org.springframework.security.core.userdetails.UserDetailsService;
import org.springframework.security.core.userdetails.UsernameNotFoundException;

public class UserDetailsServiceImpl implements UserDetailsService 
{
 final static Logger LOG = LoggerFactory.getLogger(UserDetailsServiceImpl.class);
 
 protected String  appCd;
 
 public UserDetailsServiceImpl()  {}

 @Required
 public void setAppCd(String appCd)
 {
  if ( appCd != null && appCd.length() > 0 )
           this.appCd = appCd;
 }
    
    // override
    public UserDetails loadUserByUsername(String username)
            throws UsernameNotFoundException, DataAccessException 
    {
      
         String role = "ROLE_viewer"  ;  //hard coded, in real life retrieved via database or LDAP
         GrantedAuthorityImpl au_impl = new GrantedAuthorityImpl(role);
         Collection<GrantedAuthority> authorities = new ArrayList<GrantedAuthority>();
         authorities.add(au_impl);
         
         User usr = new User(username, "", true, true, true, true, authorities);
         return usr;
         
    }
}


The part-2 will cover annotating your Java methods and the URLs that intercept the calls to verify the roles (or authorities) returned for a given user against the roles allowed for a method or URL.


Labels: , ,

May 3, 2013

Wiring up Spring framework Dependency Injection with annotations

Q13. How will you go about wire components using Spring annotations?
A13. Here are the high level steps involved in wiring up a web application in Spring using annotations.

web.xml --> myAppServletContext.xml --> myapp-applicationContext.xml --> MyAppController.java --> MyAppService.Java --> MyAppDaoImpl.java

Pay attention to how the different artifacts are wired up using both Spring xml files and annotations. The Spring beans can be wired either by name or type. @Autowired by default is a type driven injection. @Autowired is Spring annotation, while @Inject is a JSR-330 annotation. @Inject is equivalent to @Autowired or @Autowired(required=true). @Qualifier spring annotation can be used to further fine-tune auto-wiring. There may be a situation when you create more than one bean of the same type and want to wire only one of them with a property, in such case you can use @Qualifier annotation along with @Autowired to remove the confusion by specifying which exact bean will be wired.

The Step 3: demonstrates "name" driven wiring up using annotations.

Step 1: The web.xml file snippet.


 <servlet>
  <servlet-name>myAppServlet</servlet-name>
  <servlet-class>org.springframework.web.servlet.DispatcherServlet</servlet-class>
  <init-param>
   <param-name>contextConfigLocation</param-name>
   <param-value>/META-INF/spring/myAppServletContext.xml</param-value>
  </init-param>
  <load-on-startup>2</load-on-startup>
 </servlet>

  <!-- Creates the Spring Container shared by all Servlets and Filters -->
    <listener>
  <listener-class>org.springframework.web.context.ContextLoaderListener</listener-class>
    </listener>

  <-- add resolvers here, if required-->
  
 <servlet-mapping>
  <servlet-name>myAppServlet</servlet-name>
  <url-pattern>/myapp/*</url-pattern>
 </servlet-mapping>

Step 2: The myAppServletContext.xml file snippet.

<?xml version="1.0" encoding="UTF-8"?>
<beans xmlns="http://www.springframework.org/schema/beans"
 xmlns:xsi="http://www.w3.org/2001/XMLSchema-instance" xmlns:p="http://www.springframework.org/schema/p"
 xmlns:mvc="http://www.springframework.org/schema/mvc" xmlns:cache="http://www.springframework.org/schema/cache"
 xmlns:context="http://www.springframework.org/schema/context"
 xmlns:aop="http://www.springframework.org/schema/aop" xmlns:jee="http://www.springframework.org/schema/jee"
 xmlns:tx="http://www.springframework.org/schema/tx" xmlns:util="http://www.springframework.org/schema/util"
 xmlns:batch="http://www.springframework.org/schema/batch" xmlns:cm="http://camel.apache.org/schema/spring"
 xsi:schemaLocation="
            http://www.springframework.org/schema/beans http://www.springframework.org/schema/beans/spring-beans-3.1.xsd
            http://www.springframework.org/schema/mvc http://www.springframework.org/schema/mvc/spring-mvc-3.1.xsd
            http://www.springframework.org/schema/context http://www.springframework.org/schema/context/spring-context-3.1.xsd
            http://www.springframework.org/schema/aop http://www.springframework.org/schema/aop/spring-aop-3.1.xsd
            http://www.springframework.org/schema/jee http://www.springframework.org/schema/jee/spring-jee-3.1.xsd
            http://www.springframework.org/schema/tx http://www.springframework.org/schema/tx/spring-tx-3.1.xsd
         http://camel.apache.org/schema/spring http://camel.apache.org/schema/spring/camel-spring.xsd 
         http://www.springframework.org/schema/context http://www.springframework.org/schema/context/spring-context.xsd 
            http://www.springframework.org/schema/util http://www.springframework.org/schema/util/spring-util-3.1.xsd
            http://www.springframework.org/schema/cache http://www.springframework.org/schema/cache/spring-cache-3.1.xsd">

 
    <!-- import context files as it is not a best practice to define everything in one xml file-->
 <import resource="classpath:/META-INF/spring/myapp-applicationContext.xml" />
 
 <!-- scan for any Java based wiring up classes with @Configuration & @Bean annotations -->
 <context:component-scan base-package="com.myapp.camel.config" />
 
 
 <!-- exposing beans via JMX  not important for this tutorial -->
 <bean id="exporter" class="org.springframework.jmx.export.MBeanExporter"
  lazy-init="false">
  <property name="autodetect" value="true"></property>
  <property name="namingStrategy" ref="namingStrategy"></property>
  <property name="assembler" ref="assembler"></property>
 </bean>
 <bean id="attributeSource"
  class="org.springframework.jmx.export.annotation.AnnotationJmxAttributeSource" />
 <bean id="assembler"
  class="org.springframework.jmx.export.assembler.MetadataMBeanInfoAssembler">
  <property name="attributeSource" ref="attributeSource" />
 </bean>
 <bean id="namingStrategy"
  class="org.springframework.jmx.export.naming.MetadataNamingStrategy">
  <property name="attributeSource" ref="attributeSource" />
 </bean>

</beans>

 Step 3: The myapp-applicationContext.xml snippet with config to enable auto-scan with annotations.


As you can see, the controller, service, and DAO layer classes not configured here as they are scanned via annotation (i,e @Component is the parent annotation from which the other annotations like @Service, @Resource, @Repository etc are defined)

The annotations shown above allow you to declare beans that are to be picked up by autoscanning with <context:component-scan/> or @ComponentScan.


<?xml version="1.0" encoding="UTF-8"?>
<beans xmlns="http://www.springframework.org/schema/beans"
 xmlns:xsi="http://www.w3.org/2001/XMLSchema-instance" xmlns:p="http://www.springframework.org/schema/p"
 xmlns:context="http://www.springframework.org/schema/context"
 xmlns:aop="http://www.springframework.org/schema/aop" xmlns:jee="http://www.springframework.org/schema/jee"
 xmlns:tx="http://www.springframework.org/schema/tx" xmlns:util="http://www.springframework.org/schema/util"
    xmlns:security="http://www.springframework.org/schema/security"
 xmlns:batch="http://www.springframework.org/schema/batch" xmlns:task="http://www.springframework.org/schema/task"
 xmlns:mvc="http://www.springframework.org/schema/mvc"
 xsi:schemaLocation="
   http://www.springframework.org/schema/beans http://www.springframework.org/schema/beans/spring-beans-3.1.xsd
   http://www.springframework.org/schema/mvc http://www.springframework.org/schema/mvc/spring-mvc-3.1.xsd
   http://www.springframework.org/schema/context http://www.springframework.org/schema/context/spring-context-3.1.xsd
   http://www.springframework.org/schema/aop http://www.springframework.org/schema/aop/spring-aop-3.1.xsd
   http://www.springframework.org/schema/jee http://www.springframework.org/schema/jee/spring-jee-3.1.xsd
   http://www.springframework.org/schema/tx http://www.springframework.org/schema/tx/spring-tx-3.1.xsd
   http://www.springframework.org/schema/util http://www.springframework.org/schema/util/spring-util-3.1.xsd
   http://www.springframework.org/schema/context http://www.springframework.org/schema/context/spring-context-3.1.xsd
   http://www.springframework.org/schema/security http://www.springframework.org/schema/security/spring-security-3.1.xsd
   http://www.springframework.org/schema/task http://www.springframework.org/schema/task/spring-task-3.1.xsd">


 <mvc:annotation-driven />
 <context:annotation-config />
 
 <!-- load properties files -->
 <bean class="org.springframework.beans.factory.config.PropertyPlaceholderConfigurer">
   <property name="ignoreUnresolvablePlaceholders" value="true"/> 
      <property name="location" value="classpath:/myapp/myapp.properties"/>
     <property name="placeholderPrefix" value="$myapp{"/>
  <property name="placeholderSuffix" value="}"/>
 </bean> 

 
    <!-- any packages to exclude for component scanning-->
 <context:component-scan base-package="com.myapp">
  <context:exclude-filter type="regex" expression="com.myapp.camel.config.MyAppCamelConfig"/>
 </context:component-scan>
 
 <!-- comment this line locally to bypass security access control in development. But don't check this in commented as security will be turned off -->
 <!-- Spring security-->
 <security:global-method-security secured-annotations="enabled" pre-post-annotations="enabled" jsr250-annotations="enabled"/>
 
</beans>


Step 4: The controller class that handles HTTP requests. Annotations are used to wire up dependencies.

@Controller
public class MyAppController
{
    
    
    private final MDCLoggingHelper MDCLoggingHelper = new MDCLoggingHelper();
    
  
    @Resource(name = "myapp_Service")
    private MyAppService myAppService; 
 
    
  @RequestMapping(
            value = "/portfolio/{portfoliocd}/summaries",
            method = RequestMethod.GET,
            produces = "application/json")
    @ResponseBody
    public PortfolioSummaryVO retrievePortfolioSummary(
            @PathVariable(value = "portfoliocd") String portfolioCode,
            @RequestParam(value = "valuationDate", required = true) @DateTimeFormat(pattern = "yyyyMMdd") Date valuationDate
            HttpServletResponse response) throws Exception
    {
 
   //..................
 }
 
}


Step 5: The service class that handles business logic in a protocol agnostic manner. Annotations are used to wire up dependencies.

@Service(value = "myapp_Service")
@Transactional(propagation = Propagation.SUPPORTS)
public class CashForecastServiceImpl implements CashForecastService
{
    
 @Resource(name = "myapp_Dao")
    private MyAppDao myAppDao;
 
 @Value("$cf{myapp.file_delimiter}")
    private String defaultFeedDelimiter; //read from myapp.properties files
 
  @Override
    public PortfolioSummaryVO  retrievePortfolioSummaries(MyAppPortfolioCriteria criteria,
            FeedFileMetaInfo feedFileMeta) {
 
        //.............. 
 }
}

Step 6: The DAO class that makes database calls via a JDBC template. The configuration of JDBC template is not shown.

@Repository(value = "myapp_Dao")
public class CashForecastDaoImpl implements CashForecastDao
{
    
    @Resource(name = "myapp_JdbcTemplate")
    private JdbcTemplate jdbcTemplateSybase;//configure via jdbcContext.xml
 
 
  public PortfolioSummaryVO  retrievePortfolioSummaries(MyAppPortfolioCriteria criteria) {
      //............
  }
 
}


The @Configuration annotation was designed as the replacement for XML configuration files. The @Configuration annotated classes can still able to use annotated(@Autowired, @Inject etc.) fields and properties to request beans (and even other @Configuration annotated beans too) from the container. Here is an example of how Apache Camel is wired up using the @configuration and @bean annotations in Step 2.

Labels: